Follow these instructions to configure your iDVR PRO for remote web browser access.
- Connect your DVR to your router with a CAT-5 network cable.
- Connect a monitor to your DVR if you have not already done so and power your DVR up.
- Access the DVRs menu system using a mouse or the wireless remote control.
- On the DVR System Menu click the Network Sub-Menu.
- On the network menu, make sure the DHCP and Web Service radio boxes are checked.
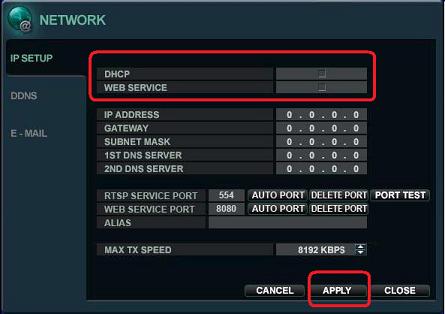
- Press the “APPLY” Button to apply and save the settings. Once the settings are saved, write down the IP address reference. NOTE: This is the DVRs local IP address and will only be accessible when you are on a computer that is connected to the same are network router as the DVR (wired or wireless).
- From a computer that is connected to the same network as your DVR, open up your web browser. If you are using a Windows PC, use Internet Explorer.
- In your web browser, type the following in the address bar: http://192.168.0.100:8080. NOTE: you need to replace 192.168.0.100 with the IP address that you noted in step 6.
Before proceeding to the port forwarding setup below, make sure that you are able to connect to your DVR using the local IP address.